Search This Blog

Friday, May 19, 2023

WLST Starting issue for FMW products

Oracle released the latest version of WebLogic 12.2.1 version in the month of October 2015. Interestingly lots of new features loaded into this version. To make common tools available for every Fusion Middleware product such as SOA, OSB, etc.

WLST shell  OSB FMW, SOA servers using alias in bash_profile
WLST OSB FMW, SOA servers using alias in bash_profile


When I've executed 'java weblogic.WLST' (old fashion) in the command prompt as I've done in the earlier version. It was deprecated in the latest version!!!

In the 12c (12.2.1 version) instead of using WebLogic you need to use Middleware infrastructure 12.2.1 installer. Which is going to support different Suite products : SOA Suite, EBS suite etc.

Could not find the offline class

The earlier version WLST was available from the WL_HOME/common/bin/wlst.sh or cmd. Now it is deprecated in the latest version.
Oracle FMWInfrastructure   issue with WLST
WLST RuntimeException in WebLogic 12.2.1
The fix here is that you must use the script present in $ORACLE_HOME/oracle_common/common/bin/wlst.sh, this will support all Oracle Fusion Middleware Homes.

WLST script path for Oracle FMW
WLST path in 11g and 12c differed

Best practice is you must include the following line in the profile file such as .bash_profile or .bashrc in your user home directory:


alias wlst="/home/oracle/products/12.2.1/Oracle_Home/oracle_common/bin/wlst.sh" 
 # or best for all next versions 
alias wlst=$ORACLE_HOME/oracle_common/common/bin/wlst.sh

Hope you like this fix, share this trick with your friends! Dont forget to like it on Facebook!

Sunday, February 26, 2023

Dynamic Cluster Scaling with WLST

Dynamic Cluster configuration on WebLogic Domain

Prerequisites


In this exciting example 😊 new learning about how to use the dynamic cluster in the latest version of WebLogic 12c [12.1.2] and above this was introduced for WebLogic on Cloud computing. To workout this you must configure a Server template when you give the maximum number of cluster servers these managed server automatically increased. When you decrease it the number of managed servers come to SHUTDOWN state as expected. To do same task from the automation using WLST prompt you need to use the following two functions:
  1. scaleUp increase the number of managed servers in the cluster
  2. scaleDown to decrease the number of managed servers in the cluster.


Image for Dynamic cluster in WebLogic
Dynamic Cluster configuration on WebLogic Domain


now let's do the automation exercise
# Dated  : 4th Feb 2016
# ScriptName : dynamicCluster.py
# Purpose :
# This script will create server template and using that
# configures a dyanamic cluster

def createServer_Template(tmpName, basePort, sslPort, machine):
        print 'creating server tempalte for '+tmpName
        cd('/')
        cmo.createServerTemplate(''+tmpName)

        cd('/ServerTemplates/'+tmpName)
        cmo.setListenPort(int(basePort))

        cd('/ServerTemplates/'+tmpName+'/SSL/'+tmpName)
        cmo.setListenPort(int(sslPort))

        cd('/ServerTemplates/'+tmpName)
        cmo.setMachine(None)


def create_dynamicCluster(clustrName, tmpName, prefix):
        print 'Creating dynamic cluster: '+clustrName
        cd('/')
        cmo.createCluster(clustrName)

        cd('/Clusters/'+clustrName)
        cmo.setClusterMessagingMode('unicast')

        cd('/ServerTemplates/'+tmpName)
        cmo.setCluster(getMBean('/Clusters/'+clustrName))

        cd('/Clusters/'+clustrName+'/DynamicServers/'+clustrName)
        cmo.setServerTemplate(getMBean('/ServerTemplates/'+tmpName))
        cmo.setDynamicClusterSize(2)
        cmo.setMaxDynamicClusterSize(8)
        cmo.setCalculatedListenPorts(true)
        cmo.setCalculatedMachineNames(true)
        cmo.setCalculatedListenPorts(true)
        cmo.setServerNamePrefix(prefix)

def main():
        connect("weblogic","welcome1","t3://192.168.33.100:6100")
        edit()
        startEdit()

        print 'Creating server templates...'
        # creating server templates
        createServer_Template('app_tier_tmp', 7120, 8120, 'mydev')
        createServer_Template('web_tier_tmp', 6120, 9120, 'mydev') # Machine already configured

        create_dynamicCluster('app_dclustr', 'app_tier_tmp','app_server0')
        create_dynamicCluster('web_dclustr', 'web_tier_tmp','web_server0')
        print 'Dynamic cluster configuration completed...'
        activate()

main()

The above generic WLST script can be executed as shown below:

Elastic cluster configuration with WLST


You could also double confirm this from your WebLogic Admin Console work-area when you select clustser in the Environment of under your Domain .

wlst output confirm Admin console
Dynamic Cluster configuration in WebLogic 12.2.1 Domain


Suggestion for future enhancements to the above script you can do following:

  1. create a properties file and pass all the main program required arguments
  2. Cluster Message Mode can be dynamic
  3. Machine per template can be set dynamic
Elastic Cluster on-demand scale up

In the WLST prompt you can test it as :

scaleUp ("app_dclustr",1, true, true)

scaleUp execution for single server:

WLST Scalability implementation
ScaleUp in WLST Execution 

scaleDown('app_dclustr',2,true,true)

Scale down weblogic cluster

scale down in WebLogic 12.2.1 Domain
Scale Down cluster size in WLST

Hope you enjoyed by reading this post,  Stay tuned to this blog and share with your friends techies...
Waiting for your comments and suggestions!!

Sunday, February 12, 2023

Server State using WLST

Hello! Dear Automation focused engineer we have this post about how to work simple server status list for a WebLogic domain. This logic can be build and executed for huge number of WebLogic or FMW Servers in Produciton helps to view all at a time hostnames, their corresponding states.   

Why we needWebLogic Server State? What all those states?

While trouble shooting Middleware/FMW administrator need to check the status of all the WebLogic server instances. This is the basic need when the all the servers are in bounced for production code move. This same script can be applicable for the pre-production or staging environment too. WLST provides the built-in methods, which gives the status of the Server instance or servers in a Cluster. Here we will deal with individual instance wise data.

Image of ServerLifeCycle in WLST
WebLogic Server Life cycle state diagram

There are several ways to list out the servers. The simple way here you go with interactive way...
In the following example 
  1. We are collecting all the list of servers present in the WebLogic domain
  2. state function applied on each server as item  passed to it
  3. repeat this step 2 until all server list ends
 
wls:/demodomain/serverConfig> x=ls('Servers',returnMap='true')
dr--   demoadm
dr--   demoms1
dr--   demoms2

wls:/demodomain/serverConfig> x
[demoadm, demoms1, demoms2]
wls:/demodomain/serverConfig> for i in x:
... state(i,'Server')
...
Current state of "demoadm" : RUNNING
Current state of "demoms1" : SHUTDOWN
Current state of "demoms2" : SHUTDOWN

Cluster listing
wls:/demodomain/serverConfig> c=ls('Clusters',returnMap='true')
dr--   clstr01

wls:/demodomain/serverConfig> c
[clstr01]
wls:/demodomain/serverConfig> state(c[0],'Cluster')

There are 2 server(s) in cluster: clstr01

States of the servers are
demoms1---SHUTDOWN
demoms2---SHUTDOWN

ServerLIfecycleRuntime Mbean tree


Using above shown MBean hierarchy we can fetch the all WebLogic domain server instance's states. If your production WebLogic domain consists of two digit (eg. 60 instances) or three digit number (eg. 120 instances) of managed server then, it is difficult to see all server’s state at once. Weblogic Administration console is unable to show all the servers in the domain on a single page. Navigating in between also a time eating process so think! think better way!! WLST has the solution.

To get the status of all servers in the domain can be obtained with the following steps
  1. Connect to the WebLogic Admin Server
  2. Fetch the Managed server list from the domainRuntime MBean
  3. Iterate the loop and get the state of each Managed Server with ServerLifeCycle Runtime MBean
  4. Repeat if required the step 3 as per the user input to Continue...
  5. Finally if all desired output is visible then disconnect from the AdminServer and exit.

################################################## 
# This script is used to check the status of all WL instances including the admin
###########################################################

def conn():
    UCF='/path/.AdminScripts/userConfigFile.sec'
    UKF='/path/.AdminScripts/userKeyFile.sec'
    admurl = "t3://hostname:wlport"

    try:
        connect(userConfigFile=UCF, userKeyFile=UKF, url=admurl)
    except ConnectionException,e:
        print '\033[1;31m Unable to find admin server...\033[0m'
        exit()

def ServrState():
    print 'Fetching state of every WebLogic instance'
#Fetch the state of the every WebLogic instance
    for name in serverNames:
        cd("/ServerLifeCycleRuntimes/" + name.getName())
        serverState = cmo.getState()
        if serverState == "RUNNING":
            print 'Server ' + name.getName() + ' is :\033[1;32m' + serverState + '\033[0m'
        elif serverState == "STARTING":
            print 'Server ' + name.getName() + ' is :\033[1;33m' + serverState + '\033[0m'
        elif serverState == "UNKNOWN":
            print 'Server ' + name.getName() + ' is :\033[1;34m' + serverState + '\033[0m'
        else:
            print 'Server ' + name.getName() + ' is :\033[1;31m' + serverState + '\033[0m'
        quit()

def quit():
    print '\033[1;35mRe-Run the script HIT any key..\033[0m'
    Ans = raw_input("Are you sure Quit from WLST... (y/n)")
    if (Ans == 'y'):
        disconnect()
        stopRedirect()
        exit()
    else:
        ServrState()

if __name__== "main":
    redirect('./logs/Server.log', 'false')       
    conn()
    serverNames = cmo.getServers()
    domainRuntime()
    ServrState()

Smart Script

Recently I have online discussion with Dianyuan Wang, state of the Managed servers can be obtained with state() command. This function can be used in two ways: 
  • To get individual managed server status you need to pass arguments as managed server name, type as 'Server'. 
  • Other one is to get individual Cluster wise status. 
This can be achieved by passing two arguments cluster name and type as 'Cluster'. The following script will be illustrate the second option, which I found that shorten code that gives same script outcome as above script. It could be leverage your scripting thoughts it is like a plain vanilla form as shown below:

Note: Hope you follow the WLST Tricks & tips
try:
    connect(url = "t3://adminhostname:adminport")
except:
    print "Connection failed"
state('appclstr','Cluster')
state('web1clstr','Cluster')

...
state('webNclstr','Cluster')
-->

Extra Stroke of this new script is that prints how many servers available in each given cluster.

Server state with redirecting, re in WLST

Wang mailed me his situation clarity of explanation why he chosen state command. And how he resolved with Python script tricks here. Its a great learning for me so sharing with you when I saw same question in StackExchange today(28 April 2014) after 3 years!! "The reason I do not use (for now) domainConfig is because some how few Weblogic domains are not in a good state, and when I run the domainConfig command, it complains that it is not enabled. Hence the alternative way I've selected here is using state command. But it don't return the state. It always return None. But it prints out the state of the server. Here you go, Better way is capture that printing output to a file using WLST command redirect-stopRedirect and then, use the Python regular expression to extract the state of each server. The following is the Python snippet how I use the redirect:
 
# Fill your own connection details 
  serverlist=cmo.getServers()   
  for s in serverlist:   
    server_nm = s.getName()
    urldict[server_nm]='t3s://'+s.getListenAddress()+':'+str(s.getAdministrationPort())   
    #domainRuntime()
    #cd('ServerLifeCycleRuntimes/'+server_nm)
    fileName='/tmp/myserver_state.txt'
    redirect(fileName)
    state(server_nm,'Server')
    stopRedirect()
    f = open(fileName)
    try:
      for line in f.readlines():
        if re.search('Current state',line):
          status[server_nm]=line
    except:
      continue
 
  Ks = status.keys()
  for s in Ks:   
    if re.search('RUNNING',status[s]):
		try:
		connect(username,password,urldict[s])
		except:
		continue
		cd("/Servers/" + s)  


...
best regards! Dianyuan Wang

Here I request you please write back your experiencing with this posting looking ahead for your issues/ suggestions as comments.

Wednesday, August 31, 2022

Database connection from WLST offline/Jython

This blog post objective

There are many monitoring scripts were developed by me in previous posts in this blog you might have seen in the above menu, we will have some wild requirement which uses pure Jython SQL module which will be full capable of 

  • You might need the output instantly with nice UI developed in AngularJS, JQuery. 
  • You could use the same logic for connecting the Fusion application schema and get the required information.
  • You can use this DB update logic in many other WLST scripts such as deployment tracking 
Jython WLST code referring to Database
WLST Jython code referring to Oracle JDBC / SQL query

My Experiment setup

  1. Vagrant Ubuntu box with Weblogic 11g installed 
  2. Vagrant Ubuntu box with Oracle XE database

Here is some sample snippets which could help you to workout differently!! Hope you like this thought.

Connect to the Oracle DB from WLST


Jython provides zxJDBC module to connect with the various Databases. one among is Oracle! Here I am tried out in the offline WLST.

wls:/offline> from com.ziclix.python.sql import zxJDBC

jdbc_url = "jdbc:oracle:thin:@192.168.33.115:1521:XE"
username = "test"
password = "welcome1"
driver = "oracle.jdbc.xa.client.OracleXADataSource"

conn = zxJDBC.connect(jdbc_url, username, password, driver)
cursor = conn.cursor(1)

Fetching records from DB from WLST

Here is the sample of SQL query which fetch the records from the database into cursor object. We can use two methods to retrieve them: fetchall(), fetchone().
wls:/offline> cursor.execute("select * from app_table")
wls:/offline> print cursor.rowcount
0
wls:/offline> cursor.fetchall()
[(100.0, 'Calendar'), (101.0, 'benfits')]

wls:/offline> cursor.execute("select * from app_table where appname='benfits'")
wls:/offline> cursor.fetchall()
[(101.0, 'benfits')]
wls:/offline> cursor.execute("select count(*) from app_table where appname='benfits'")
wls:/offline> cursor.fetchone()
(1.0,)

Inserting records from WLST

wls:/offline> stmt="INSERT INTO app_table values (?, ?)"
wls:/offline> rs=cursor.executemany(stmt,[103,'secureapp.war'])
wls:/offline> conn.commit()
wls:/offline> cursor.execute("select * from app_table")
wls:/offline> cursor.rowcount
0
wls:/offline> cursor.fetchall()
[(100.0, 'Calendar'), (101.0, 'benfits'), (103.0, 'secureapp.war')]

Update records in Database from WLST

wls:/offline> stmt="UPDATE app_table set appname = 'benefits.war' where appid=101"
wls:/offline> rs=cursor.execute(stmt)
wls:/offline> conn.commit()
wls:/offline> cursor.execute("select * from app_table")
wls:/offline> cursor.fetchall()
[(100.0, 'Calendar'), (101.0, 'benefits.war'), (103.0, 'secureapp.war')]
wls:/offline>

Troubleshooting: DatabaseError: IO Error: Connection reset [SQLCode: 17002], [SQLState: 08006]


To fix this issue Change the setup for your application, so you add the next parameter to the java command: -Djava.security.egd=file:/dev/../dev/urandom

We made this change in our java.security file and it has gotten rid of the error.
$ export JAVA_OPTION='-Djava.security.egd=file:/dev/../dev/urandom'
vagrant@mydev:/vagrant/pybin/reautomation$ wlst $JAVA_OPTION db_utility.py


References:
1. Jython 21 documentation 
2. Jython Book 1.0 Documentation on database 
3. Inspiring DB connection from WLST 

JMS Module with ConnectionFactory and Queue configuration using WLST

After almost three and half years again revisited to the JMS module script. This time the project needs are quite different. Where the Oracle WebLogic domains classified environments  but they are standalone server domains. That is only AdminServer will be there in the domain and that would be target for the JMS module, JMS Destinations.

JMS Module using WLST
JMS Module configuring using WLST


Lets begin the experimenting now, the prerequisites for this are:

  1. A WebLogic Domain configured with single AdminServer
  2. AdminServer should be up and RUNNING
  3. To execute the WLST script required PATH, alias should be defined in the profile as shown below:
  4. export MW_HOME=/u01/app/oracle/fmw
    export WL_HOME=$MW_HOME/wls/wlserver
    export USER_MEM_ARGS="-Djava.security.egd=file:/dev/./urandom"
    alias wlst="$MW_HOME/oracle_common/common/bin/wlst.sh -skipWLSModuleScanning"
    

    You can use this freshly created alias wlst at any directory to invoke WLST shell.  The option -skipWLSModuleScanning is easy, faster learnt while working on docker containers and simple way to use.

  5. Execute the configure JMS Servers
  6. The WLST Script for JMS configurations and all frequently changing values are moved into the properties file.


#========================================
# WLST Script purpose: Configuring JMS Module
# Author: Pavan Devarakonda
# Update date: 3rd Aug 2017
#========================================
from java.util import Properties
from java.io import FileInputStream
from java.io import File
from java.io import FileOutputStream
from java import io
from java.lang import Exception
from java.lang import Throwable
import os.path
import sys

envproperty=""
if (len(sys.argv) > 1):
        envproperty=sys.argv[1]
else:
        print "Environment Property file not specified"
        sys.exit(2)

propInputStream=FileInputStream(envproperty)
configProps=Properties()
configProps.load(propInputStream)

##########################################
# Create JMS Moudle will take the 
# arguments as name, subdeployment name
# target can be on admin or managed server or cluster
##########################################
def createJMSModule(jms_module_name, adm_name, subdeployment_name):
        cd('/JMSServers')
        jmssrvlist=ls(returnMap='true')
        print jmssrvlist
        cd('/')
        module = create(jms_module_name, "JMSSystemResource")
        #cluster = getMBean("Clusters/"+cluster_target_name)
        #module.addTarget(cluster)
        #adm_name=get('AdminServerName')
        adm=getMBean("Servers/"+adm_name)
        module.addTarget(adm)
        cd('/SystemResources/'+jms_module_name)

        module.createSubDeployment(subdeployment_name)
        cd('/SystemResources/'+jms_module_name+'/SubDeployments/'+subdeployment_name)
        list=[]
        for j in jmssrvlist:
                s='com.bea:Name='+j+',Type=JMSServer'
                list.append(ObjectName(str(s)))
        set('Targets',jarray.array(list, ObjectName))


def getJMSModulePath(jms_module_name):
        jms_module_path = "/JMSSystemResources/"+jms_module_name+"/JMSResource/"+jms_module_name
        return jms_module_path

def createJMSTEMP(jms_module_name,jms_temp_name):
        jms_module_path= getJMSModulePath(jms_module_name)
        cd(jms_module_path)
        cmo.createTemplate(jms_temp_name)
        cd(jms_module_path+'/Templates/'+jms_temp_name)
        cmo.setMaximumMessageSize(20)

##########################################
# JMS Queu configuration function 
# arguments are : JMS module name, Queue jndiname
# Queue name, jndi name hu
##########################################
def createJMSQ(jms_module_name,jndi,jms_queue_name):
        jms_module_path = getJMSModulePath(jms_module_name)
        cd(jms_module_path)
        cmo.createQueue(jms_queue_name)
        cd(jms_module_path+'/Queues/'+jms_queue_name)
        cmo.setJNDIName(jndi)
        cmo.setSubDeploymentName(subdeployment_name)

adminUser=configProps.get("adminUser")
adminPassword=configProps.get("adminPassword")
adminURL=configProps.get("adminURL")

connect(adminUser,adminPassword,adminURL)
#adm_name=get('AdminServerName')
adm_name=ls('Servers',returnMap='true')[0]
print adm_name
edit()
startEdit()

##########################################
#   JMS CONFIGURATION## 
##########################################
total_conf=configProps.get("total_conf")
tot_djmsm=configProps.get("total_default_jms_module")
#subdeployment_name=configProps.get("subdeployment_name")

a=1
while(a <= int(tot_djmsm)):
        i=int(a)
        jms_mod_name=configProps.get("jms_mod_name"+ str(i))
        #cluster=configProps.get("jms_mod_target"+ str(i))
        subdeployment_name=configProps.get("subdeployment_name"+ str(i))
        createJMSModule(jms_mod_name,adm_name,subdeployment_name)
        total_q=configProps.get("total_queue"+str(i))
        j=1
        while(j <= int(total_q)):
                queue_name=configProps.get("queue_name"+ str(i)+str(j))
                queue_jndi=configProps.get("queue_jndi"+ str(i)+str(j))
                createJMSQ(jms_mod_name,queue_jndi,queue_name)
                j = j + 1
        i=i+1
        a = a+1
save()
activate(block="true")
disconnect() 


Now see this is a sample of properties file that could help you to build the JMS Module, be read by the WLST script at the run time:
###################################################
# JMS SUBDEPLOY CONFIGURATION
###################################################
total_subdply=2
total_default_jms_module=2
total_conf=0
subdeployment_name1=DemoJMSFAServer1
subdeployment_name2=DemoJMSFAServer2

###################################################
# JMS MODULE CONFIGURATION
###################################################
jms_mod_name1=Demo-SystemModule1
jms_mod_name2=Demo-SystemModule2

###################################################
# JMS CONNECTION FACTORY CONFIGURATION
###################################################
conf_jndi1=demoCF
conf_name1=jms/demoCF

###################################################
#   JMS QUEUE CONFIGURATION
###################################################

total_queue1=2
queue_name11=Q1
queue_jndi11=Q1

queue_name12= BQ1
queue_jndi12= BQ1


total_queue2=2
queue_name21=Q2
queue_jndi21=Q2

queue_name22= BQ2
queue_jndi22= BQ2

#========== ADMIN DETAILS =========================
adminUser=weblogic
adminPassword=welcome1
adminURL=t3://192.168.33.100:8100
output
$ wlst jms_module.py jms_module.properties

let's see what happen when you apply this logic on your project? Did you notice any errors? Please write back 🔙 with your error screen shot. 

How do you know everything went well? Open the WebLogic Administration console to check the JMS Module Configuration has successfully created a new JMS resource or not.

You may be intrested to learn more WLST scripting for JMS you can also visit the Uniform Distributed Queue configuration post. Thanks for being with us in this post, Please write to us your errors and exceptions when you run this script.

Saturday, August 14, 2021

How to include modules and Java Options in WLST Shell?

In recent developments in the Python impacting WLST Shell as well. We might want to use Python module into our WLST scripts as well. Sometimes you need a Python module that is available for Python Community same we may use in your WLST, and sometimes you might need some JAVA_OPTIONS must be included before the WLST shell is launched.

Here I will walk you through some scenarios where you need to customize.
  1. When there is customization in WebLogic domains such as Oracle Utilities products uses the SSL enable communication for their AdminServer - Managed servers
  2. WLST shell using a connection to AdminServer with t3s protocol
  3. WebLogic domain for Oracle Data Integrator uses WLST when a managed server used to stop with 'stopManagedWebLogic.sh' or even AdminServer using 'stopWebLogic.sh' script calls WLST scripts to stop and when there is SSL enabled for the security purpose then WLST shell interaction requires SSL configuration details

How to include the Python module in WLST?

This could be a common requirement when automation scripts needs multiple Python modules into their WLST Shell.

Better you can add to your profile script. I've added the following lines to the .bashrc profile script.
alias wlst="$WL_HOME/../oracle_common/common/bin/wlst.sh"
export CONFIG_JVM_ARGS="-Djava.security.egd=file:/dev/./urandom \
-Dweblogic.security.SSL.enableJSSE=true \
-Dweblogic.security.SSL.ignoreHostnameVerification=true \
-Dweblogic.security.TrustKeyStore=DemoTrust \
-Dweblogic.security.CustomTrustKeyStoreType=JKS"

Note here if you are using Demo certificates then you can use the above. But if you have custom certificates then you need to provide Custom Certificates location. 

How you can tune or optimize your WLST Shell launching time?


In your .bashrc or bash_profile you can include the following environment variable which will boost-up or speed up your JVM launching time.
export CONFIG_JVM_ARGS=-Djava.security.egd=file:/dev/./urandom

Configuring FMW domains we expected more with CONFIG_JVM_ARG

export CONFIG_JVM_ARGS=-Dcom.oracle.cie.config.showProfile=true
This will enable the option in the configuration type screen to create a new compact SOA/OSB domain or any FMW 12+ domain. Without -Dcom.oracle.cie.config.showProfile=true FMW Domain creation will not show the Embedded Database option for Database configuration type in the Wizard.

Sunday, August 19, 2018

Configuration of GEOCODE Datasource for Oracle MapViewer

Couple of years back in the same blog I've posted how we can configure a generic datasource in WebLogic domain using WLST. Working in today's trend continuous deployment(CD) automation development I've worked on similar task that is GEOCODE datasource configuration. GEOCODE datasource is the basic configuration requirement for running Oracle MapViewer.

In Oracle Utilities Mobile Workforce Management runs on WebLogic server.

Pre-requisites
Oracle native WebLogic domain configured and the Admin Server must be up and running because our automation will be going to work online WLST.

How does it works?

In the Oracle Utilities products have a file ENVIRON.INI, that will having all connection related parameters available such as: ADMIN HOST, ADMIN PORT, UserStoreConfig files userConfigFile
userKeyFile path. By reading this file as properties we can get connected to the  running WebLogic Admin Server.

We will need the GEOCODE data source parameters, this can be passed as properties file ConfigGEOCODE.properties. To create a data source we need the following :
  1. Name of the datasoruce as GEOCODE
  2. JNDI Name as NAVTEQ_UTIL
  3. Select the database as Oracle
Connection pool configuration in the JDBC System Resource
  1. Enter your database hostname
  2. Database port
  3. Database name
  4. Database user credentials
  5. Test Connection Pool
###################****##############****################################################
# Generic Datasource configuration script applicable on any Operating Environments (Unix, Windows)
# ScriptName    : ConfigGEOCODE.py
# Properties    : ConfigGEOCODE.properties
# Updated by    : Pavan Devarakonda
# Date creation : 9th Aug 2018
###############     Connecting to Start     ################################################
def connectAdmin() :
 try:
  import os
  splebase=os.environ['SPLEBASE']
  loadProperties(splebase+"/etc/ENVIRON.INI")
  userconfig = splebase+"/etc/.wlsuserconfig"
  userkey = splebase+"/etc/.wlsuserkey"
  adminurl="t3s://"+WEB_ADMIN_SERVER+":"+WLS_ADMIN_PORT
  printline('Connectiong to adminurl: '+adminurl)
  connect(userConfigFile=userconfig,userKeyFile=userkey, url=adminurl)
  printline('Successfully connected')
 except:
  printline('Unable to find admin server...')
  exit()

#================== Printing line =====================================
def printline(msg):
        print 45*'#'
        print msg
        print 45*'#'

################### Configuring Connection Pool #############################
def connPool(DSnam) :
 DRVPARM='/JDBCSystemResources/'+DSnam+'/JDBCResource/'+DSnam+'/JDBCDriverParams/'+DSnam
 cd(DRVPARM)
 set('Url',DBURL)
 set('DriverName',DBDRV)
 cmo.setPassword('XXXXXX')

 cd(DRVPARM+'/Properties/'+DSnam)
 cmo.createProperty('user')
 cd(DRVPARM+'/Properties/'+DSnam+'/Properties/user')
 set('Value',DBUSR)

############         Creating Data source    ###############################
def createDS() :
 DSnam = DSName
 printline('Creating datasource :'+DSnam)
 cmo.createJDBCSystemResource(DSnam)
 RESOURCE='/JDBCSystemResources/'+DSnam+'/JDBCResource/'+DSnam
 cd(RESOURCE)
 set('Name',DSnam)
 #Setting JNDI name
 cd(RESOURCE+'/JDBCDataSourceParams/'+DSnam)
 print RESOURCE+'/JDBCDataSourceParams/'+DSnam
 set('JNDINames',jarray.array([String(JNDIname)], String))

 connPool(DSnam)

 #Set Connection Pool specific parameters
 cd(RESOURCE+'/JDBCConnectionPoolParams/'+DSnam)
 cmo.setTestConnectionsOnReserve(true)
 cmo.setTestTableName('SQL SELECT 1 FROM DUAL\r\n\r\n')
 #cmo.setTestTableName('SQL ISVALID')
 cmo.setConnectionReserveTimeoutSeconds(25)
 cmo.setMaxCapacity(15)
 cmo.setConnectionReserveTimeoutSeconds(10)
 cmo.setTestFrequencySeconds(120)

 cd(RESOURCE+'/JDBCDataSourceParams/'+DSnam)
 cmo.setGlobalTransactionsProtocol('TwoPhaseCommit')

 # targets the GEOCODE DataSource to utilities_cluster1
 cd('/SystemResources/'+DSnam)
 set('Targets',jarray.array([ObjectName('com.bea:Name='+clstrNam+',Type=Cluster')], ObjectName))

###########################  Main Module   #####################################
if __name__== "main":
 connectAdmin()
 edit()
 startEdit()
 # Create a new JDBC resource)
 try:
  cd('/')
  createDS()

 except BeanAlreadyExistsException:
  printline('Error: GEOCODE Datasource already exist')
  cancelEdit('y'); exit()
 save()
 activate()
 printline('Successfully created GEOCODE datasource')
 disconnect()

The properties file look like this:
#=========================================
DBURL=jdbc:oracle:thin:@mydb.server.com:1521:M1DBMAPS
DBDRV=oracle.jdbc.xa.client.OracleXADataSource
DBPASS=XXXXXXX
DBUSR=NAVTEQ_UTIL
DSName=GEOCODE
JNDIname=NAVTEQ_UTIL
clstrNam=utilities_cluster1
The script execution goes as follows:

Now prepare for execution of WLST script, setup the environment and also define proper SSL related options to include in JAVA_OPTIONS which will be considered when wlst.sh execution time.

wlst -loadProperties ConfigGEOCODE.properties ConfigGEOCODE.py

This script execution was tested successful and ready to use. You need to enter properties file corresponding to your database values.


Friday, July 13, 2018

Setting Keystore and SSL for a WebLogic Server using WLST

Configuring Custom SSL for WebLogic server                     

Working on the Oracle Utilities project, where our Environment requirement is that Mobile runtimes will communicates with secure servers. So we need to make the WebLogic server SSL Enabled with  Custom SSL certificates configuration.

WLST keystore SSL for Admin Server, Managed Server


Assumptions:

  • WebLogic 12.2.1.3 domain configured
  • Each WebLogic server SSL enabled already
  • AdminServer up and running


Here in this example I am using CA provided certificates but to publish in this post giving dummy paths and file names. The prerequisites you must have the Custom Identity and Custom Trust store


#!/usr/bin/python
# Author    : Pavan Devarakonda
# Save Script as  : set_keystoreSSL.py
# Initial drafted : 12/07/2018
#==========================================

import re

# Get location of the properties file.
execfile('/opt/MWM/scripts/set_keystore.properties')
def connectAdmin():
        # Connect to the AdminServer.
        try:
                connect(admin_username, admin_password, admin_url)
        except:
                print 'Unable to connect to AdminServer'
                exit()

def setKSnSSL4server(serverName, ksIdentityPath,ksIdentityPassword,ksTrustPath,ksTrustPassword,privateKeyAlias,keyPhrase):
        # Set keystore information.
        print "==============================="
        print "set keystore to "+serverName
        print "==============================="
        cd('/Servers/' + serverName)
        cmo.setKeyStores('CustomIdentityAndCustomTrust')

        cmo.setCustomIdentityKeyStoreFileName(ksIdentityPath)
        cmo.setCustomIdentityKeyStoreType('JKS')
        set('CustomIdentityKeyStorePassPhrase', ksIdentityPassword)
        cmo.setCustomTrustKeyStoreFileName(ksTrustPath)
        cmo.setCustomTrustKeyStoreType('JKS')
        set('CustomTrustKeyStorePassPhrase', ksTrustPassword)
        print "set SSL to "+serverName
        print "==============================="
        cd('/Servers/' + serverName + '/SSL/' + serverName)
        cmo.setServerPrivateKeyAlias(privateKeyAlias)
        set('ServerPrivateKeyPassPhrase', keyPhrase)

def main():
        connectAdmin()
        print servers
        edit()
        startEdit()
        print "========================================================================="
        print "AdminServer, utilities_server1 server set keystore, SSL custom keystore"
        print "========================================================================="
  setKSnSSL4server(adm['name'], adm['identity.path'], adm['identity.password'],adm['trust.path'],adm['trust.password'],adm['privateKeyAlias'],adm['keyPhrase'])
  setKSnSSL4server(ms1['name'], ms1['identity.path'], ms1['identity.password'],ms1['trust.path'],ms1['trust.password'],ms1['privateKeyAlias'],ms1['keyPhrase'])
        save()
        activate()
        disconnect()
        exit()

main()

This time the properties file is also python script to use the dictionary capabilities of Python to refer to the Weblogic server and its corresponding server'S keystore, SSL details to store together.


# AdminServer connection details.
admin_username='system'
admin_password='welcome1'
admin_url='t3://test.server.com:7001'

#Dictionaries for AdminServer, utilities_server1 keystore, SSL values

adm = { 'name':'AdminServer','identity.path':'/opt/myalias_cert/myIdentity.jks', 'identity.password':'welcome1', \
'trust.path':'/opt/myalias_cert/myTrustStore.jks', 'trust.password':'welcome1', \
'keyPhrase':'welcome1', 'privateKeyAlias':'myalias'}

ms1 = { 'name':'utilities_server1','identity.path':'/opt/myalias_cert/myIdentity.jks', 'identity.password':'welcome1', \
'trust.path':'/opt/myalias_cert/myTrustStore.jks', 'trust.password':'welcome1', \
'keyPhrase':'welcome1', 'privateKeyAlias':'myalias'}


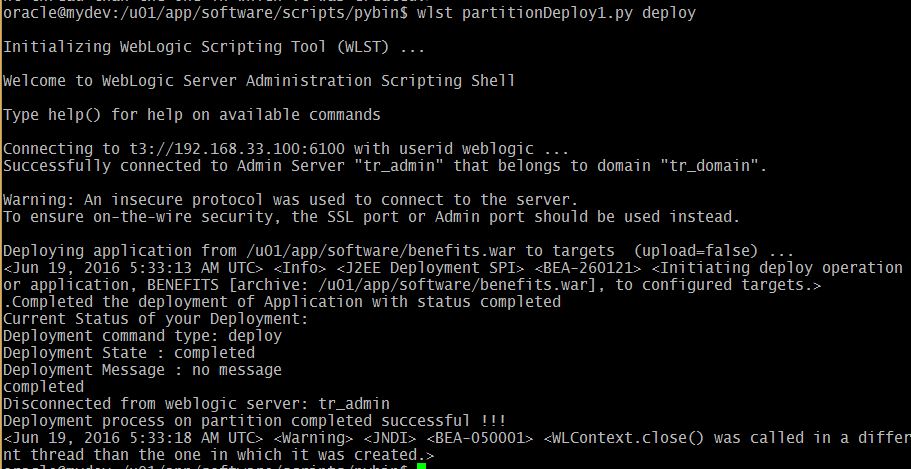
 The execution or the above script output looks as below: You can execute.

Saturday, February 3, 2018

Remotely domain extension using WLST

WebLogic latest version 12.2.x come up with different WebLogic domain templates and their usage methods in WLST. Usually WebLogic domain can be created with base domain template using wls.jar. Then after that domain need to be customized as the projects where we need the extended domain.

  1. When the domain spread across multiple machines/nodes
  2. One successful configuration domain reuse to create new domains
Here is small experiment with the domain template, here we have two nodes associated with  192.168.33.100 - Machine100 and 192.168.33101 - Machine101 IP addresses and machine. The admin server configured in the Machine100 and also two web servers in webcluster, two app servers in appcluster. The whole configuration we need in Machine101.

Earlier to WebLogic 12.2 version we have pack and unpack option only for the domain expansion in the remote machine otherwise copy the domain folder need to copy. 

In the latest versions of WebLogic 12.2.x above are having different WLST methods that relates to template usage.
Remotely extension of WebLogic Domain using WLST and pack-unpack
Lets explore options available in WLST

selectTemplate() in WLST

There are multiple domain templates, extension templates for domains are available in Oracle WebLogic installation media pack it self. Some of the application specific templates also available with the media pack.

selectCustomTemplate() in WLST

We can create our own WebLogic domain template using writeTemplate() that will be containing the project specific configurations such as - servers, cluster, JDBC, JMS are pre-configured and reusable. The select custom template method followed by loadTemplate command.

loadTemplates() in WLST

The loadTemplates(0 is the command always used after selectTemplate or selectCustomTemplate commands.

Automation solution: Create domain template and configure domain


Like here we need to create extension domain in the Machine101, you may need to to do for multiple machines in production environments.

The process is simplified into few steps
  1. connect to the existing domain
  2. Read the domain and generate the custom domain template
  3. Create the extended domain enter the same domain name and path or fresh domain can be configured with the new domain name, listen address modification as required

#======================================
# 
# File: remoteDomain.py
# Applicable WebLogic version: 12.2.x
# This will solve pack and unpack strange issues
#
#===============================================
def printline(s):
    print "-"*10 + s
 
def createDomainTemplate(templateLocation):
    
    ''' Generate the custom domain template  '''
    connect(admuser,admpass,admurl)
    
    print ("Writing Custom Template...")
    writeTemplate(templateLocation)
    print ("Writing Template...: Completed")
    disconnect()
    
def create_Domain(templateLocation, domainPath):
 ''' Creating extended domain remotely 
 selectCustomTemplate, loadTemplates will get the inputs
 then writeDomain will create the domain '''
 
 selectCustomTemplate(templateLocation)
 loadTemplates()
 print ("Creating extended domain...")
 writeDomain (domainPath)
 closeTemplate()
 print ("Creating domain...: Completed")
       
       
def main():
 '''
 Change the following values according to your domain
 user security better to use storeuserconfig
 and domain template 
 you can move these variables into properties file
 '''
 templateLocation ='/u01/app/oracle/prod_domain_template.jar'
 domainPath='/u01/app/oracle/prod_domain'
 admuser='weblogic'
 admpass='welcome1'
 admurl='192.168.33.100:8001'
 
 createDomainTemplate(templateLocation)
 create_Domain(templateLocation, domainPath)
    
if __name__ == "__main__":
    printline()
    print("SCRIPT BEING RUN DIRECTLY")
    printline()
    main()
 printline()

Remotely execution of script

WLST SCRIPT

Wednesday, July 26, 2017

Logging configuration for domain and WebLogic server

Why we need Logging?
To understand in a basic level, when we run the WebLogic Servers we don't know what is happening inside the process.  It is kind of black box to us. To know what is happening inside the domain or server side to get more details we have logging mechanism enabled in WebLogic domains.


WebLogic Logging works for multiple hierarchical Subsystem. At the top level it is already enabled and we can use the existing setup. But for some reasons each project will have separate logging needs.

When we can use this?
If there are multiple Testing logging configuration at different levels:
  1. domain level logs - global status 
  2. Server level logs - admin or managed server status
  3. Resource level logs - JDBC, JMS, application status
We can set the common attributes of JMX MBean reset with new values which will work for your project needs.

While creating this snippet we have tried to execute it on WebLogic 11g [10.3.6] and WebLogic 12c.

########################################################################
# Python Script file: logrotate.py
# Author: Pavan Devarakonda
# Date : 25-Jul-2017
########################################################################
loadProperties('demodomain.properties')
# Functions
def editMode():
   edit()
   startEdit()

def saveActivate():
   save()
   activate()
   print '###### Completed configuration of domain logs ##############'

def exitDisconnect():
        disconnect()
        exit()

def connectToAdmin():
    connect(username,password,url)

def domainlog_rotation(domainname,FC,MinSize):
        """
        It will take the three parameters domainpath ,domainname is string values
        and FileCount -  FC and File MinSize - MinSize are integer values these values loaded from properties
        so they need to type cast to integers
        """
        cd('/Log/'+domainname)
        cmo.setRotationType('bySize')
        cmo.setRotateLogOnStartup(true)
        cmo.setFileCount(int(FC))
        cmo.setNumberOfFilesLimited(true)
        cmo.setFileMinSize(int(MinSize))
        cmo.setLogFileRotationDir(domainpath+domainname+'/RotationDir')
        save()

def ServerLogRotation(S,SFC,SMinsize):
        """
        This module will rotate the AdminServer or Managed Server loggger settings
        It takes three params - S as name of the server, SFC - Server FileCount, SMinsize - Server FileMinSize
        """
        print S+ ' server log  setting...'
        cd('/Servers/'+S+'/Log/'+S)
        cmo.setRotationType('bySize')
        cmo.setRotateLogOnStartup(true)
        cmo.setFileCount(int(SFC))
        cmo.setNumberOfFilesLimited(true)
        cmo.setFileMinSize(int(SMinsize))
        cmo.setLogFileRotationDir(domainpath+domainname+'/RotationDir +S')

def printline(): print '#'*50

def main():
        printline(); print 'Starting domain logs Configurations '; printline()
        connectToAdmin()
        editMode()
        domainlog_rotation(domainname,FC,MinSize)
        printline(); print 'Starting Server logs configurations' ; printline()
        cd('/')
        for server_name in ls('Servers',returnMap='true'):
                if server_name == 'AdminServer':
                        ServerLogRotation(server_name,ASFC,ASMinsize)
                else:
                        ServerLogRotation(server_name,MSFC,MSMinsize)
        saveActivate()
        exitDisconnect()

main()

Please double check all indentation blocks.
The properties file used for sample tests is as follows:

#WebLogic console connection parameters
username=weblogic
password=welcome1
url=t3://192.168.33.102:8001
domainname=demo_domain

# Domain logger configurations
FC=4
MinSize=5
domainpath=/u01/oracle/domains/

# ManagedServer logger configurations
MSFC=3
MSMinsize=2

# AdminServer logger configurations
ASFC=5


Sample execution output as follows:
WebLogic Logger enabled and configuration using WLST scrpt execution.

Saturday, April 8, 2017

WebLogic 12c Cluster Domain configuration using WLST offline

Objective of this script is to Leverage the time takes to configure the WebLogic Domain and after starting the admin server then following list need to be configured for HA/reliability.
Everytime I work on new project there is a need of creation of the clustered domain. From my past experiences collected all basic requirements together list them over here.

  • AdminServer configuration includes Name, Listen Address, ListenPort
  • User credentials username, password
  • After writing basic domain going for create machine which include Name, type of machine
  • Nodemaager includes NMTypes such as plain, ssl, hosted node, nodemanager port
  • Managed servers have Name, ListenAddress, ListenPort, set machine
  • Cluster includes name, ClusterAddress, Servers part of the cluster interesting part here
Assumptions for this task:

WebLogic 12.2.1 cluster domain creation with WLST
WLST Configuring WebLogic Cluster Domain


In the script as per my convenience some of them are hardcoded, My hardcoded values:
  1. Managed Server list
  2. Cluster list
In this script lots of Python sequence functions are used.

  • List index, 
  • Dictionary keys
  • String startwith

Lets begin the fun of WLST HERE...
# purpose:  Create the domian with the one Admin Server along with the
# two managed servers in each cluster. app_cluster, web_cluster
# Assumption here all managed servers runs on the same machine
# Modified date: 07-April-2017
# File name     :       create_clusterdomain.py
# Dependencies  :       cluster_domain.properties
# Note this names of managed servers, cluster, hostname all hard coded
#
def printline(s):
    print "-"*10 + s

loadProperties('/u01/app/software/scripts/pybin/cluster_domain.properties')

# Created a Cluster and assaign the servers to that cluster
# Create a domain from the weblogic domain template

WLHOME=os.environ["WL_HOME"]
readTemplate(WLHOME+'/common/templates/wls/wls.jar')
printline("reading template completed")

# Configure the Administration Servers with out using SSL Port

cd('Servers/AdminServer')
set('ListenAddress',WLSAdminIP)
set('ListenPort', int(AdminPort))

printline("AdminServer ListenAddress, port set")

cd('/')
cd('Security/base_domain/User/weblogic')
cmo.setPassword(AdminPasswd)
printline("User credentials set")

setOption('OverwriteDomain', 'true')
writeDomain(DomainPath+'/'+DomainName)
printline("Domain creation done.")

closeTemplate()
readDomain(DomainPath+'/'+DomainName)
machines={'myM100':'192.168.33.100', 'myM110':'192.168.33.110'}

for m in machines.keys():
        cd('/')
        create(m, 'UnixMachine')
        cd('Machine/' + m)
        create(m, 'NodeManager')
        cd('NodeManager/' + m)
        set('ListenAddress', machines[m])
        set('NMType','ssl')

# Create the Managed Servers and  configuration them
ManagedServerList=['app01','app02','web01','web02']

app_ca=""
web_ca=""
for s in ManagedServerList:
        cd('/')
        create(s,'Server')
        cd('Server/'+s)
        i=ManagedServerList.index(s)
        lp=8101+i
        set('ListenPort', int(lp))
        j=int(s[-1])
        m=machines.keys()[j-1]
        set('ListenAddress', machines[m])
        set('Machine', m)

        if s.startswith('app') :
                if j%2==0:
                        app_ca+=','
                app_ca+=machines[m]+':'+str(lp)

        elif s.startswith('web'):
                if j%2==0:
                        web_ca+=','
                web_ca+=machines[m]+':'+str(lp)

        printline("Managed server :"+s+" created")

printline("configured managed servers done.")
printline("app cluster address:"+app_ca)
printline("Web cluster address:"+web_ca)

# Create and Configure a Cluster and assian the Managed Servers to that cluster
clusters={'app_clustr1':'app01,app02', 'web_clustr1':'web01,web02'}
clstrs=clusters.keys()
for c in clstrs:
        cd('/')
        create(c,'Cluster')
        assign('Server', clusters[c],'Cluster', c)
        cd('Clusters/'+c)
        set('ClusterMessagingMode','multicast')
        if c.startswith('app'):
                set('ClusterAddress',app_ca)
        elif c.startswith('web'):
                set('ClusterAddress',web_ca)
        set('MulticastAddress','237.0.0.101')
        set('MulticastPort',7200+clstrs.index(c))
        printline("cluster "+c+" created")

printline("Configured clusters and assigned managed servers done.")
#Write the domain and Close the domain template

updateDomain()
closeDomain()

printline("Task completed successfully, exiting!!!")
exit()

Now the properties file which you can enhance with your limitations
WLSAdminIP=192.168.33.100
AdminPort=8001
AdminPasswd=welcome1
DomainPath=/u01/app/oracle/domains
DomainName=uat_domain


Lets have the execution screen for you:


Please write your valuable feedback on this post, so that we can keep improve further to have more interesting fun stuff soon for you.

Wednesday, February 22, 2017

Restricted JRF WebLogic infrastructure domain configuration using WLST

While working on Fusion Middleware products we need to prepare the WebLogic restricted JRF domain, most of the time configuration Wizard leads to confusion and stuck with what to do for RCU configurations. Even when you need to create a domain for Collocated OHS Environment.

Pr-requisites
  1. Oracle JDK Installed
  2. Oracle Fusion Middleware Infrastructure 12.2.1 installed
  3. Environment setup with bash profile
Templates used for configuring the Restricted JRF domain

  1. JRF Restricted template - oracle.jrf_restricted_template.jar
  2. Enterprise Manager - oracle.em_wls_restricted_template.jar
  3. Coherence - wls_coherence_template.jar [default selected with above anyone of the template]


 Lets first create the properties file:

TEMPLATE=/u01/app/oracle/fmw1221/wlserver/common/templates/wls/wls.jar 
MW_HOME=/u01/app/oracle/fmw1221
ADMIN_LISTEN_ADDRESS=192.168.33.100
ADMIN_PORT=8001
ADMIN_USER=weblogic
ADMIN_PWD=Welcome1
DOMAIN_NAME=RestrictedJRF_Domain
DOMAIN_DIR=/u01/app/oracle/domains

Note: You could modifiy the MW_HOME  path

The WLST Script is  as follows:

def create_prod_domain():
 print "Reading base domain tempalte"
 readTemplate(TEMPLATE)
 cd('/')

 print "AdminServer settings"
 cmo.setName(DOMAIN_NAME)
 cd('Servers/AdminServer')
 cmo.setListenAddress(ADMIN_LISTEN_ADDRESS)
 cmo.setListenPort(int(ADMIN_PORT))
 cd( '/' )
 cd( 'Security/'+DOMAIN_NAME+'/User/' +ADMIN_USER)
 cmo.setPassword(ADMIN_PWD)
 cd('/')

 print "Production domain setup.."
 setOption("ServerStartMode", "prod")
 setOption("OverwriteDomain", "true")
 writeDomain( DOMAIN_DIR+'/'+DOMAIN_NAME )
 print "=============================================="
 print "Production domain created successfully..."
 print "=============================================="

 closeTemplate()


def apply_jrf2domain():
 # Apply the JRF Template.
 print "reading domain:"+DOMAIN_NAME
 readDomain(DOMAIN_DIR+'/'+DOMAIN_NAME )
 addTemplate(MW_HOME + '/oracle_common/common/templates/wls/oracle.jrf_restricted_template.jar')
 print "Adding Template :oracle.jrf_restricted_template.jar"

 # I'm including the EM template too.
 addTemplate(MW_HOME + '/em/common/templates/wls/oracle.em_wls_restricted_template.jar')
 print "Added Template :oracle.em_wls_restricted_template.jar"

 updateDomain()
 print "Updated the domain with Restricted JRF and Enterprise Manager templates"
 closeDomain()
 print "Close the domain"
 exit()

def main():
 print "=============================================="
 print "Welcome to Restricted JRF domain configuration"
 print "=============================================="

 create_prod_domain()
 print "Domain created successfully..."
 apply_jrf2domain()

main()

The script execution will be as follows:
wlst -loadProperties RestrictedJRF_domain.properties create_RestrictedJRF_domain.py

Note: wlst must be aliased to the Infrastructure installation wlserver path
Restricted JRF WebLogic infrastructure domain with EM template
 Advantage of this domain:
  • Enterprise Manager Fusion Middleware Control
  • Easy to work on FW products such as SOA, OSB, and Collocated OHS etc
Note that it will be consuming more memory foot print than regular base domain.

Start your Restricted JRF Domain and when you look into WebLogic Admin console deployments see the following:

WebLogic Restricted Domain deployment

Saturday, June 18, 2016

Multitenancy in WebLogic 12c Part -7 Deploy and Undeploy Application to a Domain Partition

After almost four months took me to write this, due to busy in work this blog post on WebLogic 12.2.1 MT feature exploration took some time. To workout multiple deployment scenarios on MT environment we need real-time implementation environments. As of now I've limiting my scope to web application deployment on to a partition. You could do much more wider automation using WLST based on this script.

Pre-requisites set-up for Multitenancy:

You can also visit the following post so that you can have connectivity what we are discussing here.

  1. Configure Security Realm for MT
  2. Create Users & Groups for Partition domain
  3. Configure Virtual Target
  4. Creating Partition Domain
  5. Configure IDD for Partition
  6. Partition Control (start/stop using WLST)
  7. Deploy and Undeploy Application on Partition [This post]

Download sample application

You can download sample web application for WebLogic environment :
Here I am using benefits.war which available in Oracle examples.
Download Shopping Cart Sample Link

Deploying an application to a WebLogic server fine it was upto 11g and regular WebLogic environment. In WebLogic 12.2.1 MT introduced with the great feature that is maintaining small domain partitions where you can feel the required resources all that need to run the application you will get in the partition. This MT deployment might more frequent when your application moved to WebLogic 12.2.1.

The deploy() and undeploy() command variation with the number of arguments you pass that are related to partition or resource group template. Here I've used first option targeting to a RUNNING State partition. As Oracle recommends to use ResourceGroupTemplate as target in the MT environment.

undeploy with WLST on Partition Domain
WebLogic web application deployment with WLST to a partition


The best benefit you can provide it to the partition deployment do one time deployment same partition you can package using export you will get final outcome as zip file. That you can reuse in other test environments as well.using import.

def deploy2partition(a,ap, p,rg,o):
        progress=deploy(appName=a, path=ap, partition=p, resourceGroup=rg, deploymentOrder=o, securityModel='DDOnly')
        while not (progress.isCompleted() or progress.isFailed()) :
                os.time.sleep(2)
        print progress.getState()

def undeploy4mPartition(a, p):
        progress=undeploy(appName=a,  partition=p)
        while not (progress.isCompleted() or progress.isFailed()) :
                java.lang.Thread.sleep(2000)
        print progress.getState()

def main():
        # The following are the properties which can be changed according to your needs.
        APP_PATH='/u01/app/software/benefits.war'
        APPNAME='BENEFITS'
        USER='weblogic'
        PASSWD='welcome1'
        ADMURL='t3://192.168.33.100:6100'

        connect(USER, PASSWD, ADMURL)
        partitionName="Corporate_partition"
        rgName="Corporate_rg"
        DOrder=10

        if len(sys.argv) >1:
                choice  = sys.argv[1]
        else:
                usage()

        if choice == 'deploy':
                deploy2partition(APPNAME, APP_PATH, partitionName, rgName, DOrder)
        elif choice == 'undeploy':
                undeploy4mPartition(APPNAME, partitionName)

        disconnect()
        print "Deployment process on partition completed successful !!!"

def usage():
        print """Usage:
        wlst """+sys.argv[0] +""" deploy | undeploy"""
        exit()

main()

The deploy option:
 wlst partitionDeploy1.py deploy
WLST deploy on Partition Domain
Administration Console deployment update:
The undeploy option:
 wlst partitionDeploy1.py undeploy
WLST Undeploy on Partion

Monday, January 25, 2016

Multitenancy in WebLogic 12c Part -6 Partition Domain Control

Controlling means starting the partition and shutdown the partition that we have created in the earlier post. Here my exploration on the two important WLST functions:

  1. startPartitionWait
  2. forceShutdownPartitionWait

Starts the given partition and waits until the partition reaches the requested state that is RUNNING state. To run this command the partition must already exist. Therefore startPartitionWait should not be used in the edit session.

The forceShutdownPartitionWait command will Shutdown the given partition and waits until the partition state reaches the SHUTDOWN state. Same rule works for this command as well, the partition must be exists to control it.

Prerequisites:

  1. Configure Security Realm
  2. Create Users & Groups for Partition domain
  3. Configure Virtual Target
  4. Creating Partition Domain
  5. Configure IDD for Partition
  6. Partition Control (start/stop using WLST)

Here I've prepared the customized script for stop, start and restart all the partitions in the domain.
# This script will start the partition

def startPartition(partitionName):
        print "Staring the partition :"+ partitionName
        partitionBean=cmo.lookupPartition(partitionName)
        startPartitionWait(partitionBean)

def startAllPartitions():
        print "Starting all partitions ..."
        startPartition('Corporate_partition')
        startPartition('Online_partition')

def stopPartition(partitionName):
        print "Stoping the partition :"+ partitionName
        partitionBean=cmo.lookupPartition(partitionName)
        forceShutdownPartitionWait(partitionBean)

def stopAllPartitions():
        print "Starting all partitions ..."
        stopPartition('Corporate_partition')
        stopPartition('Online_partition')


def main():
        connect("weblogic","welcome1","t3://192.168.33.100:6100")

        print "Partition Control Menu..."
        print "==========================="
        print "1. Start all partitions"
        print "2. Shutdown all partitions"
        print "3. Restart all partitions"
        control=input("Enter your control choice: ")

        if control==1:
                startAllPartitions()
        elif control==2:
                stopAllPartitions()
        elif control==3:
                stopAllPartitions()
                startAllPartitions()
        else:
                print "invalid option..."
        disconnect()


main()

The execution goes as shown below...
Starting Partition using WLST

Partition state RUNNING
Stop the Partition with menu option 2

Stop Partition using WLST
Double check the same on the WebLogic Admin console:

Shutdown Partitions on WebLogic Admin Console

Multitenancy in WebLogic 12c Part -5: Identity Domain (IDD) for Partition

Welcome back to the series of Multitenancy experiments on partitioned domain.


Resource groups in WebLogic Multitenancy Domain partition
Prerequsites
  1. Configure Security Realm
  2. Create Users & Groups for Partition domain
  3. Configure Virtual Target
  4. Creating Partition Domain
  5. Configure IDD for Partition
  6. Partition Control (start/stop using WLST)


def add_IDD4_Partition(realmName, partitionName, primary_IDD ): 
 """
 This function is developed for generic  use to adding Identity domain 
 to a partition domain.
 """
 sec = cmo.getSecurityConfiguration()
 sec.setAdministrativeIdentityDomain("AdminIDD")
 
 realm = cmo.getSecurityConfiguration().lookupRealm(realmName)
 
 # Authentication 
 defAtnP = realm.lookupAuthenticationProvider('ATNPartition')
 defAtnP.setIdentityDomain(primary_IDD)
 defAtnA = realm.lookupAuthenticationProvider('ATNAdmin')
 defAtnA.setIdentityDomain("AdminIDD")
 
 # Search for the Partition and set it as primary IDD
 p= cmo.lookupPartition(partitionName)
 p.setPrimaryIdentityDomain(primary_IDD)
 
 # For Default realm setting the IDD
 realm = sec.getDefaultRealm()
 defAtn = realm.lookupAuthenticationProvider('DefaultAuthenticator')
 defAtn.setIdentityDomain("AdminIDD")
 
 
def main():
 connect("weblogic","welcome1","t3://192.168.33.100:6100")
 edit()
 startEdit()
 
 add_IDD4_Partition('Corporate_Realm', "Corporate_partition", "Corporate_IDD" )
 add_IDD4_Partition('Online_Realm', "Online_partition", "Online_IDD" )
 
 save()
 activate()
 disconnect()
 
main()


Lets run the script that will add the Identity Domain for each partition.

WebLogic Multitenancy Partition domain with Security Realm
Select the Corporate Realm in the Security


Now select one of the security realm which you have created for the partition.


Sunday, January 17, 2016

Multitenancy in WebLogic 12c Part -4: Creating Partiton domain

Welcome back to the series of Multitenancy experiments on partitioned domain.

  1. Configure Security Realm
  2. Create Users & Groups for Partition domain
  3. Configure Virtual Target
  4. Creating Partition Domain
WebLogic domain partitions are an administrative and runtime slice of a WebLogic domain that is dedicated to running application instances and related resources for different tenant.
def create_Partition(vtName, partitionName, rgName, realmName):
        """
        This function programmed for creating partition in WebLogic domain
        it takes four arguments virtual target, Partition Name, Resource Group
        and Security Realm Name.

        """
        vt = cmo.lookupVirtualTarget(vtName)
        p = cmo.createPartition(partitionName)
        p.addAvailableTarget(vt)
        p.addDefaultTarget(vt)
        rg=p.createResourceGroup(rgName)
        rg.addTarget(vt)
        realm = cmo.getSecurityConfiguration().lookupRealm(realmName)
        p.setRealm(realm)

def main():
        connect("weblogic","welcome1","t3://192.168.33.100:6100")
        edit()
        startEdit()
        create_Partition("Online_vt","Online_partition","Online_rg",'Online_Realm')
        create_Partition("Corporate_vt","Corporate_partition","Corporate_rg",'Corporate_Realm')
        save()
        activate()
        disconnect()

main()

creating partition requires partition name, there should be resource group which can be created with default or you can have your own template for resource group. The resources could be JMS, JDBC Data source, JCA, JTA

WLST Script for create partition on WebLogic domain


admin console output

Partition successful execution of WLST 
Note: After you configure the new partitions in the domain you must restart the environment.

Popular Posts